
If you’ve ever gazed into the night sky and watched the stars and planets in awe, perhaps you’ve dreamt about taking a photograph as a keepsake. Below I have written a simple beginners’ guide to astrophotography to help capture your own marvellous Milky Way images.
Let me start by stating that I am just a hobby photographer and am still learning. My images are not perfect, often with a little camera wobble or smudge. I hope that by sharing some trick I have learned along the way, you may be able to capture the Milky Way on your next outdoor adventure.
The Kit
I am in love with my Canon 6D! It was a present to myself when I landed a great job in regional Western Australia. All the DSLRs I had owned before had been hand-me-downs from other people and I held out buying one myself until I could afford to get the one I really – and I mean REALLY – wanted.
You don’t need to spend a lot of money on fancy kit to take great astrophotography. Keep reading to find an example of astrophotography taken with a AU$350 camera! What you need is the ability to focus in low light, high ISO and manual control over shutter speed and aperture.
Where to go for Astrophotography?
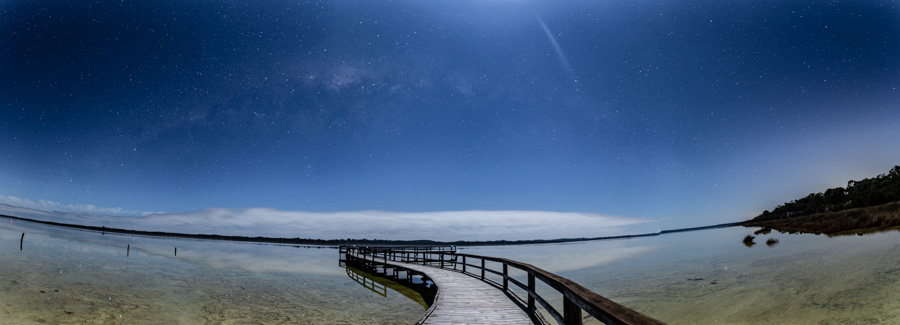
Here in Western Australia we have some of the clearest night skies in the world. I was absolutely blown away by the number and brightness of the stars here. To get really clear photos you need to be as far from light pollution as possible. We always plan some time for astrophotography when we are out camping in the outback. To show just how vibrant the night sky can be when there is no night pollution check out this photo from our recent camping trip to Wooleen Station in Australia’s Golden Outback. Other than stitching together some photos to create the panoramic, this image has had NO PROCESSING.

Read more about our Wooleen Station Stay:
- Conservation and Land Regeneration at Wooleen Station
- Wooleen Station: An Outback Eco-Tourism Adventure
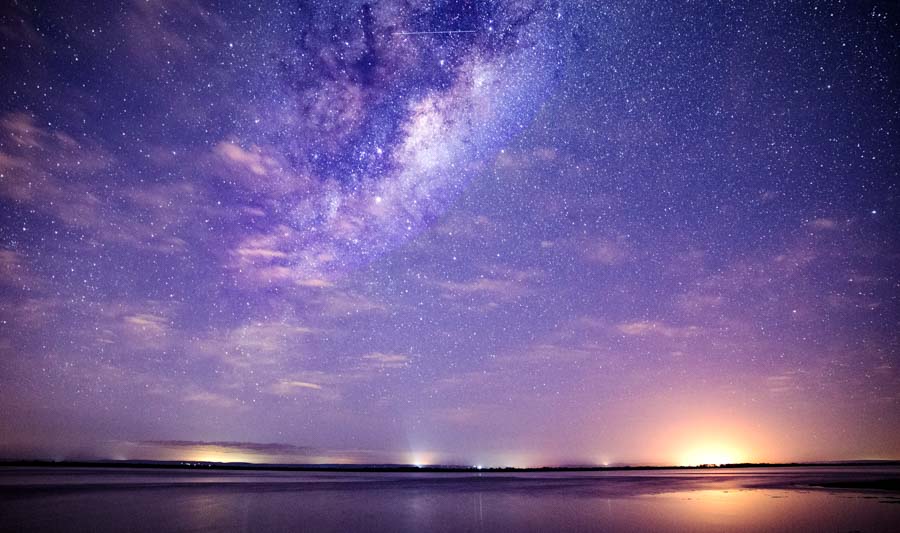
Remote locations are preferable but not essential. Sometimes a little background light gives character. See the light on the horizon from a processing plant on the other side of the estuary? The stars are not as bright but I like the overall feel (plus its only 15mins south of Mandurah town centre in the outer suburbs).

Canon EOS 6D, 15s, f2.8, 24mm, ISO3200
When is best for Astrophotography?
This depends entirely on your location in the world. Although you can find interesting things to photograph on any cloudless night, the Milky Way really is the star of the show (see what I did there? 🙂 ). Here in Australia the Milky Way is visible from January through to November and changes its position in the sky throughout this time.
The galactic centre of the Milky Way – the brightest part – can be found by searching for the constellations of Sagittarius and Scorpio. I use an app called Night Sky to help me compose my photos. This is also great for identifying planets or any satellites you may see crossing the sky.
Another app I love is PlanIt. With this I view my location on the map and see where the sun, moon and Milky Way will be on any given night. I took a screen grab of the app on the night I went out to Lake Clifton. You can see that the Milky Way forms an arch in the west just after the sun set, and before the moon rose.

And here is the panoramic looking west from the jetty that evening. You can see the Milky Way arch low over the horizon.

Canon EOS 6D, 10s, f2.8, 24mm, ISO4000
What about the moon?
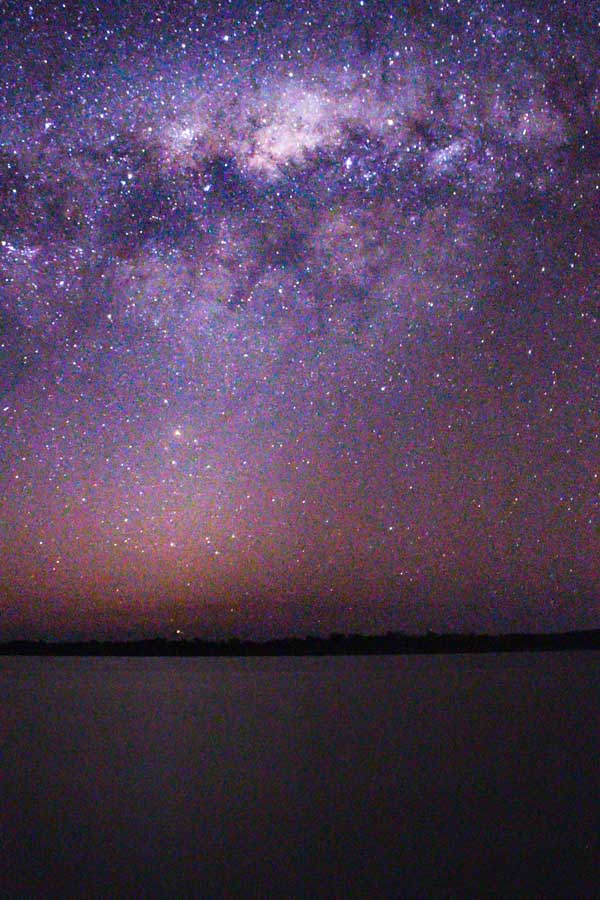
A full moon puts a lot of light pollution into the sky. See the example below from the same location. You can barely see the Milky Way and cannot see any other of the stars at all. Guess who didn’t take the moon into account before setting out that night? You guessed it, silly old me.
Canon EOS 6D, 20s, f2.8, 24mm, ISO1250
Focus
Focus can be tricky at night. In order to focus the Autofocus function needs to ‘see’ something, not easy when its pitch black!
One simple trick is to set your camera to manual focus and to infinity. This ‘should’ show distant objects in focus. This isn’t always the case though and moving back slightly from infinity may yield better results.
Manual Focussing using Live View
My Canon 6D has live view meaning the screen on the back displays a live image. I point the camera at the brightest star in the sky and zoom in on the screen as much as possible. I then adjust the focus until the star is sharp.
Autofocus on a light source
If there is a light in the distance, say a lighthouse or street light, you may be able to use autofocus to focus on that. Next, switch your camera to manual focus so your camera will not try and focus with each image.
Tip: I set my iPhone up in the distance and autofocus on the screen.
My old camera did not allow manual focus, but did allow me to lock focus. I used the iPhone trick to focus this camera before locking the focus.
Focus Before Sunset
The easiest way to focus your camera, though it does require more time, is to focus on an object in the distance before the sun goes down. Then lock the focus, or set to manual, and wait for the sky to get dark and stars to appear.
RAW or JPEG?
I shoot everything in RAW as I like to tweak things in processing. Shooting in JPEG will still give great results, just a little less flexible in processing. If you’re not confident with post processing the JPEG is just fine and still allow you to play around with the image later.
Tripod
With long exposures you are going to need to keep the camera steady. Don’t try and hold the camera, it’s just not going to work. A sturdy tripod is preferable, however, if you’re just starting out you can always balance your camera on a rolled up jumper or hard surface.
Shutter Release/Timer
Sometimes just touching your camera to press the button can jiggle it enough to smear your stars. I have a shutter release remote but if you don’t have one of those, just set a 2 second timer on your camera. That way you can hit the button and be well clear before the camera starts taking the photo.
Camera Settings
Aperture
Set your aperture to its lowest setting. This will be the f-number on the display. A low aperture, e.g. f2.8 opens the aperture in the lens. A high number, e.g. f18 closes the aperture, letting less light in. You want to capture as much light as possible so choose the lowest setting you camera allows.
Shutter Speed
You will need a long exposure to capture as much light as possible. Too long though and you will start to get star trails due to the rotation of the earth. The Rule of 500 will tell you how long you can keep your shutter open. Simply divide 500 by the focal length of your lens.
Using my lens for example: I have the focal length set to 24. So 500/24= 20.1. Therefore I should be able to use a shutter speed of 20 seconds and get a sharp picture.
ISO
The ISO determines how sensitive your sensor is to incoming light. I tend to start with ISO 3200 and play around until I get a result I like. You can increase the ISO to say 6400 which will bring out more stars, but you will also get more noise in your photo. Some noise can be removed in processing but its best not to capture it in the first place if possible.
White Balance
I set my white balance to Custom and 4000. This gives a nice blue or black colour to the sky. If you shoot in RAW you can easily adjust this in processing if the WB doesn’t look right on your computer.
Experiment
Each camera is different, as is each location. It’s best to play around with the settings and find what works best for you.
My standard settings are 15s, f2.8, ISO4000 but I adjust them just about every time I go out to suit each individual scene.
Light Painting
A great way to give your images more depth is to highlight the foreground. You can use a flashlight to illuminate a tree or old building, or even reveal hidden underwater features such as the thrombolites in the image below.
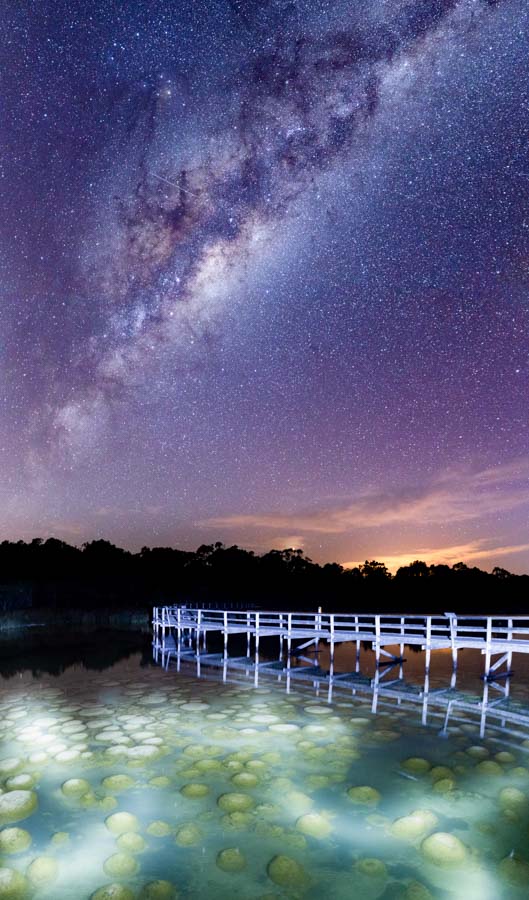
Canon EOS 6D, 15s, f2.8, 24mm, ISO3200
You can read about the Thrombolites – fascinating Living Fossils – and how I accidentally caught my first ever Aurora Australis completely by accident here.
Capturing the Aurora
The settings to capture the Northern or Southern Lights will depend on how bright they are. I’ve never been lucky enough to photograph them when they are bright enough to be seen with the naked eye, however a long exposure can reveal hidden hues. The picture below was taken in Lucky Bay, Esperance. We could not see the Aurora ourselves but you can see the bright greens and purples in the photos.

Canon EOS 6D, 15s, f2.8, 24mm, ISO4000
Switch It Up
I am a big fan of trial and error in photography! I try all sorts of compositions in different conditions to see what works. I particularly love the first emergence of the Milky Way after the sun goes down and the sky still has some sunset hues. I captured the following photo when just setting up and experimenting with my focussing – it turned out to be my favourite shot of the night!
Canon EOS 6D, 20s, f2.8, 24mm, ISO6400
You Don’t Always Need Expensive Kit!!
Admittedly, photography is always easier when you have the best gear, but thats not to say you cannot give it a go with an everyday camera; the one you might have at home. I asked some local photographers to share some of their photos taken on affordable cameras. Check out their incredible images below…
Canon 700D (borrowed from a very generous friend)
Canon PowerShot s200

At only $349 this camera is very affordable. You can check Michael’s incredible photography on his site Astrophotobear.com. There you will fill find examples of the very best astrophotography and a standard I hope to achieve someday.
Canon 70D

Nikon D5100

Let Your Imagination Run Wild
I just love this photo by Paul Cooper of Infinite Panda Studios! There is not limit to your creativity when you know how to use your kit and are willing to experiment.
So, You Want To Learn More?
Over the years I have picked up lot of tips from other photographers. Below are some tutorials and blogs that I love. Definitely check them out for more advanced astrophotography:
- Youtube: Astrordinary: The Photography of Paean Ng
- Astrophotography with a Smartphone! (Yes, you read that right!) Matthew Reilly Photography
- Lonely Speck for a heap of tutorials, gear reviews and advice
Time To Give It A Go Yourself
So there you have a few tricks you start you on your astro-jourey. All that is left now is to get out there and give it a go.
I’d love to know how you get on! Do you have a favourite star gazing spot? Any astrophotography tips you’d love to share? Share your thoughts in the comments below.
Happy stargazing!


These photos are just incredible!! I really want to try and get better at this – I had a little play a few weeks ago but I didn’t have a tripod, and I was just sitting the camera on the car, can’t believe I didn’t think to use a timer! I’ll have to have another go, this has inspired me. 🙂 I did get some fairly good northern lights shots a few months ago but they were all very slightly blurred so I’ll definitely need to invest in a good tripod.
I’ve loved looking at photos of the stars since I was a kid. Now that I have a good camera and this guide, I’m so excited to test out my astrophotography skills!
Wow you have taken some amazing pics..just loved it.thanks for this informative article .I learned a lot and will it out soon
Such an informative post. I need to share this with my sister. She has been interested in night photography and gave it a second try recently on our trip to Banff. Your photos are amazing and it makes me want to learn night photography as well!!!
Thank you, I hope your sister find this useful
Ah! So glad to have come across this guide. I’ve been wanting to grab those night shots FOREVER and just purchased a lens that allows for more adequate settings to capture stars. Thank you!
How great, let me know how you get on with your new lens
Wow, you have really inspired me to go out and try some night photography. I have been wanting to try really bad but I feel like I will be disappointed with the results. This guide is super easy to understand though, so I feel a little more confident after reading. It’s all about trial and error, like you said!
Oh you should see some of my early shots! Just a blurry dark landscape with barely a star in sight haha. I hope you have luck with your first astro-expedition 🙂
Holy cow these are gorgeous! I’m definitely saving this one for later! I live in Seattle so our weather gets dreary, but we have beautiful summers.
Oh I would love to go to Seattle some day! You could get seem pretty cool city skyline long exposures there. Plus, I bet the mountains around the cite would be great for astro on a clear night
These are awesome pictures. It is quite difficult to take such photos. Thanks for the tips.
Thank you. You’re right that it’t not easy. It took me years to figure out how to focus properly. Hopefully this makes it a little easier for others 🙂
Love this – so interesting. I don’t know the first thing about astronomy lol, but this guide is so clear and well written. I definitely think I could follow it. I’ve recently been to the Kruger Park and this would have been perfect for my time there!
Thank you Hayley. Kruger would be amazing for astrophotography! I went there back in 2011 but that was before I knew really anything about photography.
Oh wow! Thank you for the great advice! I’m a beginner with my Sony A6000 and so much of the technical stuff is still over my head. Your instructions are easy to follow. I can’t wait to try it out!
Thank you, I’m glad it reads well. Have fun with your A6000 and let me know how you get on 🙂
What beautiful pictures you have of the stars. I want to go to Australia to see the stars. I can not see them here due to the man made light. Thanks for sharing.
Thank you. It is wonderful that we have so little light pollution here
Really awesome capturing and its cracking tremondous astrophotography places you have mentioned, Thanks for sharing the great places for photography and helping the begginers by teaching …
Thank you. I hope that it helps some families enjoy the night sky and astrophography for themselves 🙂
SUCH a useful guide! So wished I knew some of this advice when visiting New Zealand as it was the first time I’d seen the Milky Way properly. Now I’m in Australia however I cannot wait to try out your tips and will definitely be downloading the app, I’ve bookmarked this and I know I’ll need it very soon!
Thank you. I’m sure you’ll have success now travelling Aus. We are blessed with incredibly clear skies over here
Your photos are stunning! Thanks for the tips. We’re going camping in Yallingup soon, so might have to try some.
Oh Astrophotography in Yallingup will be so great! We went a few months back and I wanted to get up at night to go out and shoot the stars but was enjoying my cosy bed too much. Please let us know how you get on
Awesome tips!! Always wondered how to do this.. Great explanation.
Dou you think a Canon 5600D can do the same? which lens can be best?
Hi yes I think you should be ok with a 5600D so long as you figure out how to lock the focus and use the manual settings. Use the widest lens you have, i.e. the shortest mm and lowest f number. I use 24mm and f2.8 myself but some of the examples were using f4.5 so still possible even without a wide lens 🙂 Best of luck!
This information is so helpful and useful! I have a DSLR camera that I never use to it’s full potential. I’d like to start learning how and this makes me feel confident I could capture some great photos. And I totally love your Milky Way pun 😊
Thank you, I do love a bad pun haha. I hope you find this useful in taking your own starry night photos
I am SO glad I came up on this!! I’m headed to Wadi Rum next week and honestly didn’t know where to start with how to take good photos of the stars. The phone trick is absolutely genius!
Thank you! I hope you have a wonderful time in Wadi Rum. You’ll have some really fascinating foreground there and I’m sure you’ll capture some incredible images 😀